When a simple BB replacement became messy...
I'd last replaced the bottom bracket on my beloved winter bike, Rusty, back in July 2014. Though this bike logs the least mileage of all my bikes, it's used in the harshest of conditions; snow, ice, and worst of all, lots of salt, so the wear is rather accelerated. Since then, I'd removed the cranks once, to clean and reseat the BB, but had mishandled the crank removal, resulting in some partial thread stripping. The BB had now failed completely and needed to be removed, and I made the same mistake while attempting to remove the crank (I tried operating the crank puller, before removing the locking nut). This time, the threads which were already damaged, completely gave up the ghost. I winced, realizing that I had to use a lot of violence to get it off now.
I checked a couple of videos on youtube, and realized that I either had to try with a special tool called TC-8, by Parktool (or one of its many knock-offs), to clean up the threads, to allow the crank puller to grip the crank, or simply saw the top off the crank. Since I had no patience to order for specialist tools which have little reuse potential, I decided to deploy my trusty hacksaw. I knew that I'd committed to destructive removal of the crank, but I wasn't too sure of how I wanted to cut the crank, so my first attempt was poor. I tried an angular cut, with the intention of following up with a second angular cut, to remove a wedge out of the crank, much like a slice of cake, but the angle made it hard to use the saw. I gave up on the wedge removal idea, and instead decided to simply take the top off the crank, and so I started my second attempt, with a saw blade that was already getting blunt (I'd used to to cut a steel fork-tube earlier, so it'd already seen some hard action). After some amount of laboring, I got the top off the crank. I then used an old screwdriver to give the broken bottom bracket a couple of whacks, and just like that, it was out. With the crank arm out of the way, removing the BB lock ring, and the actual replacement of the BB itself were fairly trivial tasks. After finishing the task, I made mental notes to myself, to ensure that in the future, I'd always remember to remove the crank arm's lock nut, before using the crank puller. And also that the crank screws are lefty-loosy (clockwise turns to tighten), but the BB lock ring on the drive side (right side) is reverse threaded, just as the pedal on the left side is reverse threaded. Those are things worth remembering, before attempting to remove cranks or pedals!
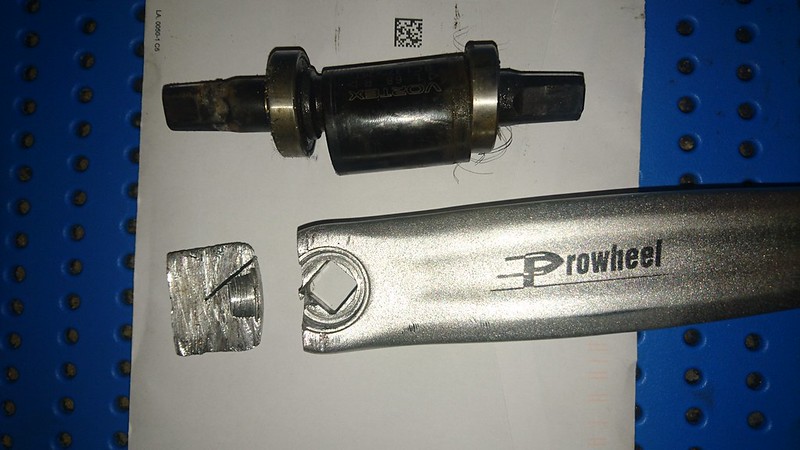 The sawn-off crank revealing severely stripped threads, and the broken BB.